this is the form of drawing with which painting in the oil medium is properly concerned. the distinction between drawing and painting that is sometimes made is a wrong one in so far as it conveys any idea of painting being distinct from drawing. painting is drawing (i.e. the expression of form) with the added complication of colour and tone. and with a brush full of paint as your tool, some form of mass drawing must be adopted, so that at the same time that the student is progressing with line drawing, he should begin to accustom, himself to this other method of seeing, by attempting very simple exercises in drawing with the brush.
most objects can be reduced broadly into three tone masses, the lights (including the high lights), the half tones, and the shadows. and the habit of reducing things into a simple equation of three tones as a foundation on which to build complex appearances should early be sought for.
exercise in mass drawing.
here is a simple exercise in mass drawing with the brush that is, as far as i know, never offered to the young student. select a simple object: some of those casts of fruit hanging up that are common in art schools will do. place it in a strong light and shade, preferably by artificial light, as it is not so subtle, and therefore easier; the 111light coming from either the right or left hand, but not from in front. try and arrange it so that the tone of the ground of your cast comes about equal to the half tones in the relief.
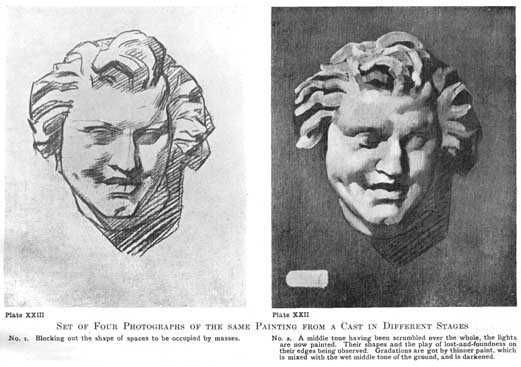
plate xxiii.
set of four photographs of the same painting from a cast in different stages
no. 1. blocking out the shape of spaces to be occupied by masses.
no. 2. a middle tone having been scumbled over the whole, the lights are now painted. their shapes and the play of lost-and-foundness on their edges being observed. gradations are got by thinner paint, which is mixed with the wet middle tone of the ground, and is darkened
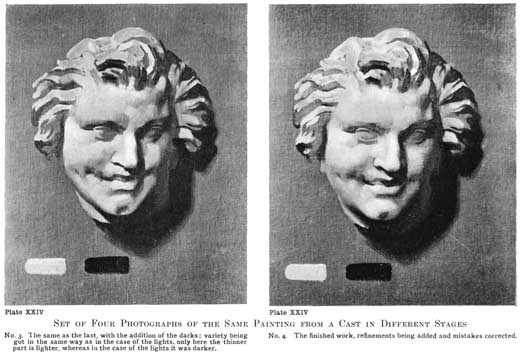
plate xxiv.
set of four photographs of the same painting from a cast in different stages
no. 3. the same as the last, with the addition of the darks; variety being got in the same way as in the case of the lights, only here the thinner part is lighter, whereas in the case of the lights it was darker.
no. 4. the finished work, refinements being added and mistakes corrected.
first draw in the outlines of the masses strongly in charcoal, noting the shapes of the shadows carefully, taking great care that you get their shapes blocked out in square lines in true proportion relative to each other, and troubling about little else. let this be a setting out of the ground upon which you will afterwards express the form, rather than a drawing—the same scaffolding, in fact, that you were advised to do in the case of a line drawing, only, in that case, the drawing proper was to be done with a point, and in this case the drawing proper is to be done with a brush full of paint. fix the charcoal well with a spray diffuser and the usual solution of white shellac in spirits of wine.
taking raw umber and white (oil paint), mix up a tone that you think equal to the half tones of the cast before you. extreme care should be taken in matching this tone. now scumble this with a big brush equally over the whole canvas (or whatever you are making your study on). don't use much medium, but if it is too stiff to go on thinly enough, put a little oil with it, but no turpentine. by scumbling is meant rubbing the colour into the canvas, working the brush from side to side rapidly, and laying just the thinnest solid tone that will cover the surface. if this is properly done, and your drawing was well fixed, you will just be able to see it through the paint. now mix up a tone equal to the highest lights on the cast, and map out simply the shapes of the light masses on your study, leaving the 112scumbled tone for the half tones. note carefully where the light masses come sharply against the half tones and where they merge softly into them.
you will find that the scumbled tone of your ground will mix with the tone of the lights with which you are painting, and darken it somewhat. this will enable you to get the amount of variety you want in the tone of the lights. the thicker you paint the lighter will be the tone, while the thinner paint will be more affected by the original half tone, and will consequently be darker. when this is done, mix up a tone equal to the darkest shadow, and proceed to map out the shadows in the same way as you did the lights; noting carefully where they come sharply against the half tone and where they are lost. in the case of the shadows the thicker you paint the darker will be the tone; and the thinner, the lighter.
when the lights and shadows have been mapped out, if this has been done with any accuracy, your work should be well advanced. and it now remains to correct and refine it here and there, as you feel it wants it. place your work alongside the cast, and walk back to correct it. faults that are not apparent when close, are easily seen at a little distance.
i don't suggest that this is the right or only way of painting, but i do suggest that exercises of this description will teach the student many of the rudimentary essentials of painting, such elementary things as how to lay a tone, how to manage a brush, how to resolve appearances into a simple structure of tones, and how to manipulate your paint so as to express the desired shape. this elementary paint drawing is, as far as i know, never 113given as an exercise, the study of drawing at present being confined to paper and charcoal or chalk mediums. drawing in charcoal is the nearest thing to this "paint drawing," it being a sort of mixed method, half line and half mass drawing. but although allied to painting, it is a very different thing from expressing form with paint, and no substitute for some elementary exercise with the brush. the use of charcoal to the neglect of line drawing often gets the student into a sloppy manner of work, and is not so good a training to the eye and hand in clear, definite statement. its popularity is no doubt due to the fact that you can get much effect with little knowledge. although this painting into a middle tone is not by any means the only method of painting, i do feel that it is the best method for studying form expression with the brush.
but, when you come to colour, the fact of the opaque middle tone (or half tone) being first painted over the whole will spoil the clearness and transparency of your shadows, and may also interfere with the brilliancy of the colour in the lights. when colour comes to be considered it may be necessary to adopt many expedients that it is as well not to trouble too much about until a further stage is reached. but there is no necessity for the half tone to be painted over the shadows. in working in colour the half tone or middle tone of the lights can be made, and a middle tone of the shadows, and these two first painted separately, the edges where they come together being carefully studied and finished. afterwards the variety of tone in the lights and the shadows can be added. by this means the difference in the quality of the colour between 114lights and shadows is preserved. this is an important consideration, as there is generally a strong contrast between them, the shadows usually being warm if the lights are cool and vice versa; and such contrasts greatly affect the vitality of colouring.
try always to do as much as possible with one stroke of the brush; paint has a vitality when the touches are deft, that much handling and continual touching kills. look carefully at the shape and variety of the tone you wish to express, and try and manipulate the swing of your brush in such a way as to get in one touch as near the quality of shape and gradation you want. remember that the lightest part of your touch will be where the brush first touches the canvas when you are painting lights into a middle tone; and that as the amount of paint in the brush gets less, so the tone will be more affected by what you are painting into, and get darker. and in painting the shadows, the darkest part of your stroke will be where the brush first touches the canvas; and it will gradually lighten as the paint in your brush gets less and therefore more affected by the tone you are painting into. if your brush is very full it will not be influenced nearly so much. and if one wants a touch that shall be distinct, as would be the case in painting the shiny light on a glazed pot, a very full brush would be used. but generally speaking, get your effects with as little paint as possible. thinner paint is easier to refine and manipulate. there will be no fear of its not being solid if you are painting into a solidly scumbled middle tone.
many charming things are to be done with a mixture of solid and transparent paint, but it is 115well at first not to complicate the problem too much, and therefore to leave this until later on, when you are competent to attack problems of colour. keep your early work both in monochrome and colour quite solid, but as thin as you can, reserving thicker paint for those occasions when you wish to put a touch that shall not be influenced by what you are painting into.
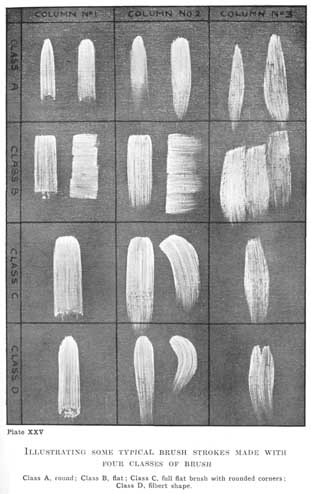
plate xxv.
illustrating some typical brush strokes made with four classes of brush
class a, round; class b, flat; class c, full flat brush with rounded corners; class d, filbert shape.
it will perhaps be as well to illustrate a few of the different brush strokes, and say something about the different qualities of each. these are only given as typical examples of the innumerable ways a brush may be used as an aid to very elementary students; every artist will, of course, develop ways of his own.
the touch will of necessity depend in the first instance upon the shape of the brush, and these shapes are innumerable. but there are two classes into which they can roughly be divided, flat and round. the round brushes usually sold, which we will call class a, have rather a sharp point, and this, although helpful in certain circumstances, is against their general usefulness. but a round brush with a round point is also made, and this is much more convenient for mass drawing. where there is a sharp point the central hairs are much longer, and consequently when the brush is drawn along and pressed so that all the hairs are touching the canvas, the pressure in the centre, where the long hairs are situated, is different from that at the sides. this has the effect of giving a touch that is not equal in quality all across, and the variety thus given is difficult to manipulate. i should therefore advise the student to try the blunt-ended round brushes first, as they give a 116much more even touch, and one much more suited to painting in planes of tone.
the most extreme flat brushes (class b) are thin and rather short, with sharp square ends, and have been very popular with students. they can be relied upon to give a perfectly flat, even tone, but with a rather hard sharp edge at the sides, and also at the commencement of the touch. in fact, they make touches like little square bricks. but as the variety that can be got out of them is limited, and the amount of paint they can carry so small that only short strokes can be made, they are not the best brush for general use. they are at times, when great refinement and delicacy are wanted, very useful, but are, on the whole, poor tools for the draughtsman in paint. some variety can be got by using one or other of their sharp corners, by which means the smallest possible touch can be made to begin with, which can be increased in size as more pressure is brought to bear, until the whole surface of the brush is brought into play. they are also often used to paint across the form, a manner illustrated in the second touch, columns 1 and 2 of the illustration on page 114 [transcribers note: plate xxvi].
a more useful brush (class c) partakes of the qualities of both flat and round. it is made with much more hair than the last, is longer, and has a square top with rounded corners. this brush carries plenty of paint, will lay an even tone, and, from the fact that the corners are rounded and the pressure consequently lessened at the sides, does not leave so hard an edge on either side of your stroke.
another brush that has recently come into fashion is called a filbert shape (class d) by the makers. it is a fine brush to draw with, as being 117flat it paints in planes, and having a rounded top is capable of getting in and out of a variety of contours. they vary in shape, some being more pointed than others. the blunt-ended form is the best for general use. either this class of brush or class c are perhaps the best for the exercises in mass drawing we have been describing. but class a should also be tried, and even class b, to find out which suits the particular individuality of the student.
on page 114 [transcribers note: plate xxvi] a variety of touches have been made in turn by these different shaped brushes.
in all the strokes illustrated it is assumed that the brush is moderately full of paint of a consistency a little thinner than that usually put up by colourmen. to thin it, mix a little turpentine and linseed oil in equal parts with it; and get it into easy working consistency before beginning your work, so as not to need any medium.
in the first column (no. 1), a touch firmly painted with an equal pressure all along its course is given. this gives you a plane of tone with firm edges the width of your brush, getting gradually darker or lighter as your brush empties, according to the length of the stroke and to whether you are painting into a lighter or darker ground.
in column no. 2 a drag touch is illustrated. this is a very useful one. the brush is placed firmly on the canvas and then dragged from the point lightly away, leaving a gradated tone. a great deal of the modelling in round objects is to be expressed by this variety of handling. the danger is that its use is apt to lead to a too dexterous manner of painting; a dexterity more concerned with the clever manner in which a thing is painted than with the truth expressed.
118column no. 3. this is a stroke lightly and quickly painted, where the brush just grazes the surface of the canvas. the paint is put on in a manner that is very brilliant, and at the same time of a soft quality. if the brush is only moderately full, such touches will not have any hard edges, but be of a light, feathery nature. it is a most useful manner of putting on paint when freshness of colour is wanted, as it prevents one tone being churned up with another and losing its purity. and in the painting of hair, where the tones need to be kept very separate, and at the same time not hard, it is very useful. but in monochrome painting from the cast it is of very little service.
another method of using a brush is hatching, the drawing of rows of parallel lines in either equal or varying thicknesses. this method will lighten or darken a tone in varying degree, according to whether the lines are thick, thin, or gradated—somewhat in the same way that lines of shading are drawn in line work. in cases where the correction of intricate modelling is desired and where it would be very difficult to alter a part accurately by a deft stroke of the brush, this method is useful to employ. a dry brush can be drawn across the lines to unite them with the rest of the work afterwards. this method of painting has lately been much used by those artists who have attempted painting in separate, pure colours, after the so-called manner of claude monet, although so mechanical a method is seldom used by that master.
as your power of drawing increases (from the line drawing you have been doing), casts of hands and heads should be attempted in the same manner as has been described. illustrations are given of 119exercises of this description on pages 110 and 122. unfortunately the photographs, which were taken from the same study at different stages during the painting, are not all alike, the first painting of the lights being too darkly printed in some cases. but they show how much can be expressed with the one tone, when variety is got by using the middle tone to paint into. the two tones used are noted in the right-hand lower corner.
try to train yourself to do these studies at one sitting. but if you find you cannot manage this, use slower drying colours, say bone brown and zinc white, which will keep wet until the next day.
when you begin studying from the life, proceed in the same way with monochrome studies painted into a middle tone.
and what are you to do if you find, when you have finished, that it is all wrong? i should advise you to let it dry, and then scumble a middle tone right over the whole thing, as you did at first, which will show the old work through, and you can then correct your drawing and proceed to paint the lights and shadows as before. and if only a part of it is wrong, when it is quite dry rub a little, poppy oil thinned with turpentine over the work, as little as will serve to cover the surface. if it is found difficult to get it to cover, breathe on the canvas, the slightest moisture will help it to bite. when this is done, wipe it off with the palm of your hand or an old piece of clean linen. now paint a middle tone right over the part you wish to retouch, being careful about joining it up to the surrounding work, and proceed as before, drawing in the light and shadow masses.
this form of drawing you will probably find more difficult at first. for the reason already explained 120it seems natural to observe objects as made up of outlines, not masses. the frame with cottons across it should be used to flatten the appearance, as in making outline drawings. and besides this a black glass should be used. this can easily be made by getting a small piece of glass—a photographic negative will do—and sticking some black paper on the back; turning it over the front to keep the raw edges of the glass from cutting the fingers. or the glass can be painted on the back with black paint. standing with your back to the object and your painting, hold this glass close in front of one of your eyes (the other being closed), so that you can see both your painting and the object. seeing the tones thus reduced and simplified, you will be enabled more easily to correct your work.
i should like to emphasise the importance of the setting-out work necessary for brush-drawing. while it is not necessary to put expressive work into this preparatory work, the utmost care should be taken to ensure its accuracy as far as it goes. it is a great nuisance if, after you have put up some of your fair structure, you find the foundations are in the wrong place and the whole thing has to be torn down and shifted. it is of the utmost necessity to have the proportions and the main masses settled at this early stage, and every device of blocking out with square lines and measuring with your knitting-needle, &c., should be adopted to ensure the accuracy of these large proportions. the variations and emphases that feeling may dictate can be done in the painting stage. this initial stage is not really a drawing at all, but a species of mapping out, and as such it should be regarded. the only excuse for making the elaborate preparatory drawings on 121canvas students sometimes do, is that it enables them to learn the subject, so that when they come to paint it, they already know something about it. but the danger of making these preparatory drawings interesting is that the student fears to cover them up and lose an outline so carefully and lovingly wrought; and this always results in a poor painting. when you take up a brush to express yourself, it must be with no fear of hurting a careful drawing. your drawing is going to be done with the brush, and only the general setting out of the masses will be of any use to you in the work of this initial stage. never paint with the poor spirit of the student who fears to lose his drawing, or you will never do any fine things in painting. drawing (expressing form) is the thing you should be doing all the time. and in art, "he that would save his work must often lose it," if you will excuse the paraphrase of a profound saying which, like most profound sayings, is applicable to many things in life besides what it originally referred to. it is often necessary when a painting is nearly right to destroy the whole thing in order to accomplish the apparently little that still divides it from what you conceive it should be. it is like a man rushing a hill that is just beyond the power of his motor-car to climb, he must take a long run at it. and if the first attempt lands him nearly up at the top but not quite, he has to go back and take the long run all over again, to give him the impetus that shall carry him right through.
another method of judging tone drawing is our old method of half closing the eyes. this, by lowering the tone and widening the focus, enables you to correct the work more easily.
in tone drawing there is not only the shape of 122the masses to be considered, but their values—that is, their position in an imagined scale from dark to light. the relation of the different tones in this way—the values, as it is called—is an extremely important matter in painting. but it more properly belongs to the other department of the subject, namely colour, and this needs a volume to itself. but something more will be said on this subject when treating of rhythm.
we saw, in speaking of line drawing, how the character of a line was found by observing its flatnesses and its relation to straight lines. in the same way the character of modelling is found by observing its planes. so that in building up a complicated piece of form, like a head or figure, the planes (or flat tones) should be sought for everywhere. as a carver in stone blocks out his work in square surfaces, the modelling of a figure or any complex surface that is being studied should be set out in planes of tone, painting in the first instance the larger ones, and then, to these, adding the smaller; when it will be seen that the roundnesses have, with a little fusing of edges here and there, been arrived at. good modelling is full of these planes subtly fused together. nothing is so characteristic of bad modelling as "gross roundnesses." the surface of a sphere is the surface with the least character, like the curve of a circle, and the one most to be avoided in good modelling.
in the search for form the knowledge of anatomy, and particularly the bony structures, is of the utmost importance. during the rage for realism and naturalism many hard things were said about the study of anatomy. and certainly, were it to be used to overstep the modesty of nature in these 123respects and to be paraded to the exclusion of the charm and character of life, it would be as well left alone. but if we are to make a drawing that shall express something concrete, we must know something of its structure, whatever it is. in the case of the human figure it is impossible properly to understand its action and draw it in a way that shall give a powerful impression without a knowledge of the mechanics of its construction. but i hardly think the case for anatomy needs much stating at the present time. never let anatomical knowledge tempt you into exaggerated statements of internal structure, unless such exaggeration helps the particular thing you wish to express. in drawing a figure in violent action it might, for instance, be essential to the drawing, whereas in drawing a figure at rest or a portrait, it would certainly be out of place.
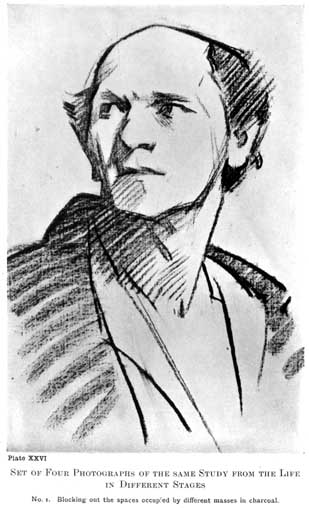
plate xxvi.
set of four photographs of the same study from the life in different stages
no. 1. blocking out the spaces occupied by different masses in charcoal.
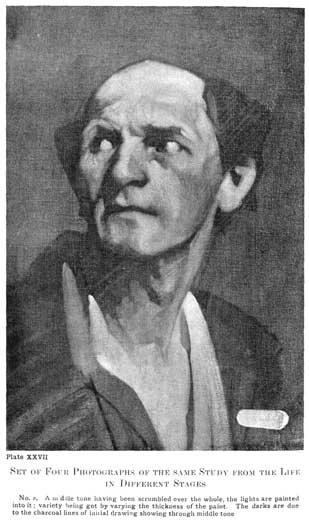
plate xxvii.
set of four photographs of the same study from the life in different stages
no. 2. a middle tone having been scumbled over the whole, the lights are painted into it; variety being got by varying the thickness of the paint. the darks are due to the charcoal lines of initial drawing showing through middle tone.
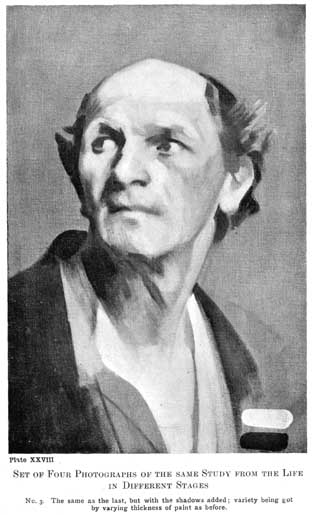
plate xxviii.
set of four photographs of the same study from the life in different stages
no. 3. the same as the last, but with the shadows added; variety being got by varying thickness of paint as before.
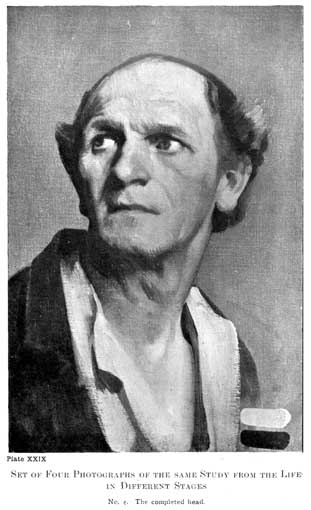
plate xxix.
set of four photographs of the same study from the life in different stages
no. 4. the completed head.
in the chapter on line work it was stated that: "lines of shading drawn across the forms suggest softness, lines drawn in curves fulness of form, lines drawn down the forms hardness, and lines crossing in every direction atmosphere," and these rules apply equally well to the direction of the brush strokes (the brush work) in a painting.
the brush swinging round the forms suggests fore-shortening, and fulness of form generally, and across the forms softness, while the brush following down the forms suggests toughness and hardness, and crossing in every direction atmosphere. a great deal of added force can be given to form expression in this way. in the foreshortened figure on the ground at the left of tintoretto's "finding of the body of st. mark," the foreshortened effect helped by the brush work swinging round can be seen (see illustration, 124page 236 [transcribers note: plate xlix]). the work of henner in france is an extreme instance of the quality of softness and fleshiness got by painting across the form. the look of toughness and hardness given by the brush work following down the forms is well illustrated in much of the work of james ward, the animal painter. in his picture in the national gallery, "harlech castle," no. 1158, this can be seen in the painting of the tree-trunks, &c.
the crossing of the brush work in every direction, giving a look of atmosphere, is naturally often used in painting backgrounds and also such things as the plane surfaces of sky and mist, &c.
it is often inconvenient to paint across the form when softness is wanted. it is only possible to have one colour in your brush sweep, and the colour changes across, much more than down the form as a rule. for the shadows, half tones and lights, besides varying in tone, vary also in colour; so that it is not always possible to sweep across them with one colour. it is usually more convenient to paint down where the colours can be laid in overlapping bands of shadow, half tone and light, &c. nevertheless, if this particular look of softness and fleshiness is desired, either the painting must be so thin or the tones so fused together that no brush strokes show, or a dry flat brush must afterwards be drawn lightly across when the painting is done, to destroy the downward brush strokes and substitute others going across, great care being taken to drag only from light to dark, and to wipe the brush carefully after each touch; and also never to go over the same place twice, or the paint will lose vitality. this is a method much employed by artists who delight in this particular quality.
125but when a strong, tough look is desired, such as one sees when a muscle is in violent action, or in the tendon above the wrist or above the heel in the leg, or generally where a bone comes to the surface, in all these cases the brush work should follow down the forms. it is not necessary and is often inadvisable for the brush work to show at all, in which case these principles will be of little account. but when in vigorously painted work they do, i think it will generally be found to create the effects named.
drawing on toned paper with white chalk or chinese white and black or red chalk is another form of mass drawing. and for studies it is intended to paint from, this is a quick and excellent manner. the rapidity with which the facts of an appearance can be noted makes it above all others the method for drapery studies. the lights are drawn with white, the toned paper being allowed to show through where a darker tone is needed, the white (either chalk or chinese white) being put on thickly when a bright light is wanted and thinly where a quieter light is needed. so with the shadows, the chalk is put on heavily in the darks and less heavily in the lighter shadows. since the days of the early italians this has been a favourite method of drawing drapery studies (see illustrations, page 260 [transcribers note: plate liv]).
some artists have shaded their lights with gold and silver paint. the late sir edward burne-jones was very fond of this, and drawings with much decorative charm have been done this way. the principle is the same as in drawing with white chalk, the half tone being given by the paper.
keep the lights separate from the shadows, let 126the half tone paper always come as a buffer state between them. get as much information into the drawing of your lights and shadows as possible; don't be satisfied with a smudge effect. use the side of your white chalk when you want a mass, or work in parallel lines (hatching) on the principle described in the chapter on line drawing.